8Code Generation
The book Understanding SNMP MIBs by David Perkins & Evan McGinnis defines MIB specifications as follows:
SNMP Management Information Base (MIB) specifications are documents containing definitions of management information so that networked systems can be remotely monitored, configured, and controlled.
In other words, a MIB specification describes the interface between device and management software. A MIB specification is typically written before the corresponding SNMP agent and management systems are implemented. Thus, generating code from MIB specifications provides the following benefits:
Code generation ensures that a MIB implementation strictly follows the corresponding MIB specification which improves the quality of the implementation.
Code generation cuts months from your implementation schedule by automatically generating the SNMP agent. You are able to spend more time on the agent/manager functionality and less time on implementing interfaces.
8.1Code Generation Benefits with AgenPro & AGENT++
The following benefits are specific to the code generation for AGENT++:
Automatically generates a SNMP agent from MIB modules.
Transparently provides SNMPv1/v2c/v3 functionality.
Ensures correct implementation of multiple indexes, table ordering, row status and storage type textual conventions, variable constraints, access rules, and notifications.
Generates notification objects which allow sending a trap with a single method call while checking that columnar objects are sent with fully qualified index information and all required variables are provided.
MIB changes can be easily applied to an existing agent implementation. The agent is simply regenerated and recompiled. Existing instrumentation code is preserved.
No need for special (non SMI) tags in the MIB files. Thus, any SMI conform MIB can be used directly for code generation. The configuration can be entirely stored in project files.
AgenPro can be run from command line for integration with your build process.
Running autoreconf is only necessary if you want to use the autoconf tools for build management of AGENT++, when using cmake with AGENT++ 4.5 or later, running these commands is not necessary of course.
When generating code for AGENT++ 4.0 or later and you are using autoconf instead of cmake for build management, then after source files have been generated the following shell commands need to be executed on the command line in the agent++ directory:
autoreconf -i
./configure
Of course you can add options to the configure command as needed. Running those commands make sure, that the newly generated files are included in the Makefiles of the agenpro directory.
8.2Code Generation Benefits with AgenPro & SNMP4J-Agent
The following benefits are specific to the code generation for SNMP4J-Agent:
Automatically generates a SNMP agent from MIB modules.
Transparently provides SNMPv1/v2c/v3 functionality.
Ensures correct implementation of multiple indexes, table ordering, row status, storage type and other SNMPv2-TC textual conventions, variable constraints, access rules, and notifications.
MIB changes can be easily applied to an existing agent implementation. The agent is simply regenerated and recompiled. Existing instrumentation code is preserved.
No need for special (non SMI) tags in the MIB files. Thus, any SMI conform MIB can be used directly for code generation. The configuration can be entirely stored in project files.
AgenPro provides full Maven integration through its Maven Plugin.
8.3Code Generation Prerequisites
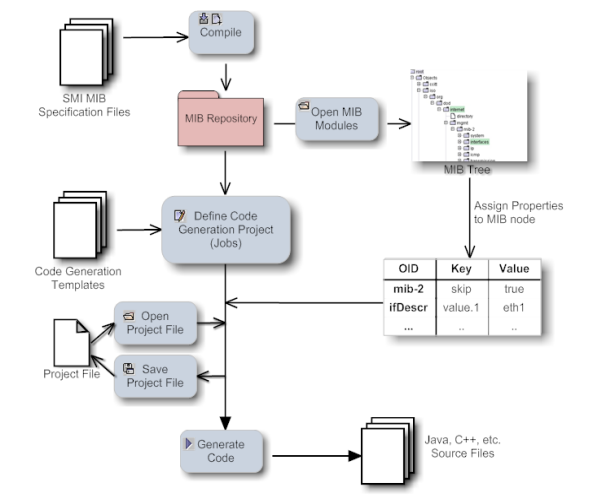
AgenPro's code generation process is illustrated by figure Code Generation Process. Before the code generation itself can be started by choosing Generate  from the Project menu, there are a few tasks to be done beforehand (steps 1-5):
1.Compile your MIB files into AgenPro's MIB Repository.
2.Load the MIB modules you want to generate code for into the MIB tree.
3.Create a new project using the project wizard (see Accessing the Project Wizard). If you intend to generate code for AGENT++ or SNMP4J-Agent, then you might want to open the example projects located in the projects directory of the AgenPro installation. If you intend to generate code for any other SNMP agent or manager API, then you should read the section Customizing Code Generation first. This is also recommended if you would like to customize code generation for AGENT++ or SNMP4J-Agent.
4.Assign properties that parameterize the code generation process to MIB nodes.
5.Save the project.
6.Generate the program code.
8.4Running Code Generation Jobs
The code generation jobs specified for a project can be run by:
|
From the command line:
1.Run AgenPro using the agenpro.bat (Windows) or agenpro.sh (UNIX) files in AgenPro's installation directory as follows:
agenpro.sh <project_file>
where <project_file> is the path of a previously saved project file.
2.To compile MIB modules into AgenPro's MIB repository from the command line use:
agenpro.sh -a <MIBFileOrDirectory1> .. <MIBFileOrDirectoryN>
3.To use a specific MIB repository (other than that configured in AgenPro's configuration file) you can use the -r option on the command line:
agenpro.sh -r <repositoryDirectory> [-l <license> <licenseKey>] [-c <AgenProConfigFile>] <project_file>
The code will be generated for all MIB modules found in the input file(s) and which have not been excluded by the -e option - regardless of the settings in the project unless option -i is given. Then only those explicitly included modules will be generated.
4.To directly generate code from a set of MIB files without compiling them into a MIB repository:
agenpro.sh -m <MIBFileOrDirectory1> [-m <MIBFileOrDirectory2>] [-v] [-i <MIBModuleName1> [-i <MIBModuleName2> ..]] [-e <MIBModuleName1> [-e <MIBModuleName2> ..]] [-l <license> <licenseKey>] [-c <AgenProConfigFile>] [-d <rootDirIO>] [-t <rootDirTemplates>] <project_file>
The -v option replaces variable references of the form ${<name>} in the value portions of the project properties file with the corresponding system variable with the name <name>.
The optional -t and -d options override the template root directory and the IO root directory of the project specified.
With the -i and -e options MIB modules can be explicitly included and/or excluded from the code generation. For example:
-i @SNMP4J-AGENT-TU.* -i DISMAN-SCHEDULE-MIB
will only include MIB modules starting with SNMP4J-AGENT-TU or named DISMAN-SCHEDULE-MIB.
5.To get help on the command line options, run:
agenpro.sh -h
Using the Graphical User Interface (GUI)
1.From the Project menu, choose Generate  .
.
<context1>:
[<ModuleName1>.]<objectName1>[,[<ModuleName2>.]<objectName2>..[,[<ModuleNameN>.]<objectNameN>]
;
<...>
where ModuleNameN is the module name of the MIB specification defining the MIB object with name objectNameN. There must be generated at least one context per selection template which has to contain at least one object name. Specifying a MIB module name for an object name is optional but recommended since it prevents incorrect mappings when a project's MIB modules do not have unique object names.
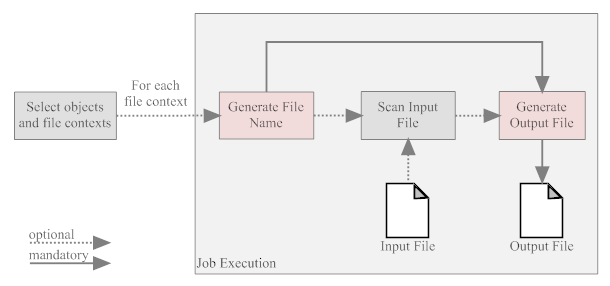
Using selection templates allows to individually select which objects to be generated in which files. By leaving the selection template column empty, one of the standard code generation options Once and For each module must be chosen. For most agents using the standard templates is sufficient and provides the best code generation performance. By using one of the standard code generation options, the code generation job starts with step 2 below.
The file name generation template is called. Depending on the job type, the context provided by the generation template is used to generate the file name for the file(s) generated by this job. The output of the template is appended to the job's input and output directory to form the paths for the input and output files respectively.
If an input directory has been specified for the job, then the corresponding input file will be scanned for user code protection tags of the forms described in Code Protection, for example:
//--AgentGen BEGIN=<class>[::<method>]
<any program code that is protected during a (re)generation>
//--AgentGen END
The program code found between the tags will then be stored in a Hashtable accessible through the context existingCode. The key for the Hashtable entries is built using the form: <class>[::<method>].
Finally, the code generation template is called with the contexts described in the section Customizing Code Generation . The produced output is written to the output file(s) specified by the generated file name(s) and the given output directory. If output and input directory are the same, then the input file(s) will be overwritten by the generated output.
8.6Customizing Code Generation
An outstanding feature of AgenPro is its flexibility. The complete code generation process can be customized which allows to write code generation from SNMP MIB specifications for virtually any programming language and SNMP agent or manager API.
AgenPro's code generation templates are based on VTL, the Velocity Template Language from Apache. Also VTL, in the first place, is designed for generating text or HTML output with dynamic content, its clear differentiation between model, view, and controller (MVC) makes it also a first choice for code generation.
The control structures provided by VTL are limited, but they also make it easy for users with little or no programming experience to write scripts based on VTL. Supported control statements are #if..#else..#end to conditionally execute statements and #foreach..#end to execute statements for each element of a given list. With the #macro statement parts of script that are frequently used can be combined into a function that can be called in the template by #<macro_name>. Please refer to the VTL user guide or the VTL reference for a complete description of the VTL language.
An AgenPro template differs from any other Velocity Macro (VM) only by the model AgenPro provides for the template. The Model is accessed from a VM through contexts.
AgenPro offers three kinds of code generation jobs that provide different sets of contexts:
1.jobs that are run once per code generation
2.jobs that are run once per MIB module
3.jobs that are run once per each context generated by a selection template.
For most use cases, the first two job types are sufficient and provide the best performance. However if you need full flexibility, the third type would be the best choice. The first two types are used by the standard AGENT++ code generation projects whereas the third is used by the more advanced example project that selects the MIB objects to generate by a VTL template and generates each table and each scalar and notification object in its own set of source files. The SNMP4J-Agent default templates also use a context selection template.
The contexts supported by the three job types are listed in the below table and grouped as follows:
1.The first group of Velocity contexts provide utility functions and services that are independent from the chosen job generation type.
2.The second group of Velocity contexts provide access to objects available in the job's current file context. When running a job of type "by selection", then there might by more than one file context per job execution. In any other case, these Velocity contexts of this group will not change during the execution of the job.
3.The third and last group of Velocity contexts provide access to the MIB modules and module names that were selected in step three of the code generation wizard. When executing a job of type "by selection" the content of these Velocity contexts remain the same, regardless for which file contexts code generation templates are executed. To get the MIB modules selected by a selection template for a particular file context, use the contextModules and contextModuleNames Velocity contexts.
|
Context |
Class |
Job |
Description |
|---|---|---|---|
|
Map |
all |
The existingCode context contains the protected code snippets collected from the input file, if an input directory had been specified. Otherwise, the Hashtable is empty. The key for the Hashtable entries is built using the form: <class>[::<method>]. |
|
|
AgenUtils |
all |
The agenUtils context provides various utility functions supporting the analysis of MIB content. For example, retrieving MIB objects by name and getting the effective syntax of an OBJECT TYPE. |
|
|
AgenStringUtils |
all |
The agenStringUtils context provides string utility functions to search and replace strings using regular expressions. |
|
|
IAgentCapabilities |
all |
This context is only available if a AGENT-CAPABILITIES statement has been selected for this project in the corresponding project wizard. It provides access to the selected statement's SMI definition. |
|
|
IModule |
2,3* |
The module context provides access to the target MIB module of this code generation job. |
|
|
String |
2,3* |
The name of the target MIB module (e.g. SNMPv2-MIB). |
|
|
String |
2,3* |
The name of the target MIB with hyphen "-" replaced by underscores "_" (e.g. SNMPv2_MIB). |
|
|
String |
2,3 |
The context name string generated by the selection template. This can be any string that must not contain ";", ",", and "=" characters. In case of jobs of type 2, the context name string equals the moduleName. |
|
|
String |
2,3 |
The context name string generated by the selection template where hyphen characters ("-") are replaced by underscores ("_"). |
|
|
List |
2,3 |
The contextModules Velocity context provides access to all IModule instances selected for the current file context. In case of a job of type "once per module", the contents of this Velocity context is the same as modules. |
|
|
List |
2,3 |
The contextModules Velocity context provides access to all MIB module names selected for the current file context. In case of a job of type "once per module", the contents of this Velocity context is the same as moduleNames. |
|
|
List |
3 |
The contextObjects Velocity context provides access to all IObject instances selected for the current file context. |
|
|
List |
2,3 |
The scalars context provides access to all scalar OBJECT-TYPE definitions of module. |
|
|
List |
2,3 |
The tables context provides access to all table objects defined in module. Table objects are those OBJECT-TYPE definitions that have an INDEX clause. The objects are ordered by their object identifier (OID) |
|
|
List |
2,3 |
The tablesByDependencies context provides access to the same table objects as the context tables, but in different order. Tables with an INDEX clause „AUGMENTS“ will succeed tables which those tables depend on. Thr remaining tables are sorted by their object identifier (OID). |
|
|
Map |
2,3 |
The columns context provides access to all columnar OBJECT-TYPE definitions. The keys of the Map are the table objects in the table context Vector. By calling the get method of the columns Map all columnar objects of the corresponding table are returned as a List of IObjectType instances. |
|
|
Map |
2,3 |
The indexes context provides access to the index objects of table objects. The keys of the Map are the table objects in the table context List. By calling the get method of the columns Map all index objects of the corresponding table are returned as a List of IObjectType instances. |
|
|
List |
2,3 |
The notifications context provides access to all trap and notification objects defined in module. Notifications are TRAP-TYPE (SMIv1) or NOTIFICATION-TYPE (SMIv2) definitions. |
|
|
List |
2,3 |
The identities context provides access to all OBJECT-IDENTITY definitions defined in module. This list is empty for SMIv1 MIB modules. |
|
|
String |
all† |
The output (file name) generated by the file name generation template. Consequently, this context is not available in the file name generation template itself. |
|
|
String |
all† |
Same as above but dots "." in the filename are replaced by underscores "_". |
|
|
List |
3 |
All contexts generated by the selection template. For each of the context string in this vector there will be an output file generated. To get the index of the current context within a code generation template, the $contexts.indexOf($context) method can be used. |
|
|
List |
1,3 |
The modules context provides access to all MIB modules (IModule instances) for that program code should be generated. |
|
|
List |
1,3 |
The moduleNames context provides access to all MIB module names (String instances) of the target modules. |
|
*Although these contexts are available in jobs of type 3, its use is not recommended because the MIB module referenced is the first MIB module that occurs in the generated contexts. Any other MIB modules used in the context will be hidden by these contexts. Instead of using such a context, the $agenUtils.getModule(IObject) method should be used to determine the MIB module for a MIB object. †These contexts are not available in code generation templates. |
Since AgenPro 4.1 the following type of comments are supported:
|
Comment Start/End |
Tag |
Example |
|---|---|---|
|
// |
|:AgenPro|= |
//|:AgenPro|=_helloWorld String msg = "Hello World"; //|AgenPro:| |
|
// |
--AgentGen BEGIN= |
//--AgentGen BEGIN=_helloWorld String msg = "Hello World"; //--AgentGen END |
|
/* */ |
|:AgenPro|= |
/*|:AgenPro|=_helloWorld*/ String msg = "Hello World"; /*|AgenPro:|*/ |
|
<!-- --> |
|:AgenPro|= |
<!--|:AgenPro|=pom.xml-->#if ($existingCode.get("pom.xml")) $existingCode.get("pom.xml") #else <project></project> #end <!--|AgenPro:|--> |
|
#-- --# |
|:AgenPro|= |
#--|:AgenPro|=agen.properties--# #if ($existingCode. $existingCode.get("agen.properties") #else snmp4j.agent.cfg.contexts= #end #--|AgenPro:|--# |
The Tags containing the character sequence AgentGen are still supported but should not be used for new development.
The tags starting with a // comment do not have an end comment. Instead, the line end terminates the string after the equal sign of the tag. That string following the start tag, is used as key for the parsed code between the tags. The key must be unique per source (input) file.
Since version 5.0, AgenPro provides a live code generation preview. The preview is enabled by default and can be enabled/disabled using the Preview check box of the Project menu or directly on the Preview icon ( ) of the tool bar.
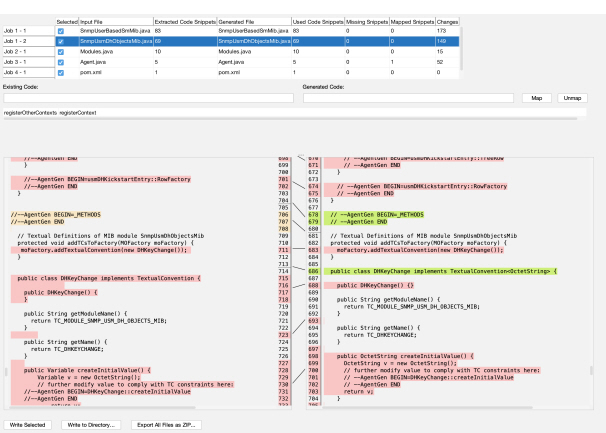
Live previewing the code generation allows you to quickly check how modifying the code generation settings affect the generated files. Especially using the code snippet mapping can help moving existing code to renamed MIB objects when updating to the code to match refactored MIB modules.
When live preview is enabled and changing any of the following:
code generation project definition
properties
any of the input files
AgenPro will run code generation as defined, but instead of creating or modifying files in the target directories, files are generated into corresponding temporary directories.
Figure 5 shows the table representing the code generation jobs executed and the files generated for each job. By selecting a row in that table, the differences between the current file (on the left) compared with the generated file (on the right) will be computed and displayed.
Changes are displayed with colored background:
orange
block has been deleted
red
block has been modified
green
block has been added
While reviewing the changes, you can either edit the source file or the code generation template that produced the output file by using the context menu in the preview table:
Edit Input File
Opens the input file (if defined) with the system’s editor associated with input file’s extension.
Edit Code Template
Opens the code template file generated the selected job output file with the system’s editor associated with the extension of the template.
If any of the input files or the code templates are updated and live preview is enabled, then AgenPro will run the preview code generation again.
As explained in Code Protection, there are areas in generated code, that can be retained when a file is regenerated. This works because the IDs of the protected areas are the same in input files and output files.
Generated code that is related to MIB object definitions contains the name of the MIB object in their code IDs. Thus, when the name of the MIB object changes during development of a MIB module, the protected code areas cannot be preserved because the IDs of the code areas (snippets) do not match anymore.
To mitigate such refactoring issues, mapping code IDs from input to output file IDs can be done easily in the preview panel:
1.Start typing the object name (or other code snippet ID prefix) in the “Existing Code:” text field.
2.Use the completion function with the up/down keys to select an existing code snippet ID.
3.Enter the new/refactored object name (or other code snippet ID prefix) in the “Generated Code:” text field.
4.Save the new or updated mapping to the current project definition by pressing the Map button.
Mappings can be removed by selecting them in the list and pressing the Unmap button.
Alternatively mappings can be deleted and created using a wildcard notation too. This can be done by appending the asterisk character (*) as last character of both code IDs (input/existing and output/generated).
By then pressing Map or Unmap, AgenPro will search for existing code snippet IDs that begin with the specified prefix and will map them to the specified pattern by creating those individual entries in the mapping table (Map).
Otherwise, if Unmap is pressed, any matching mappings - regardless if existing code ID matches the specified prefix or the generated code ID prefix matches - will be removed from the mapping table.
8.7.2Write or Export Preview Code
There are three options to directly use the code generated for the preview:
Write Selected
The table with the generated files for each code generation job has a column Selected where generated files can be selected to be taken into account for this operation. By default, all files are selected. By pressing this button, the files generated for the preview will be copied to the originally defined target location.
Write to Directory
Works similar to Write Selected, i.e. it will only write files selected in the preview table.
Note: If the project specification does not specify a root folder, i.e. uses absolute paths in job definitions, then this operation will not work as expected.
The first and main difference is, that you can select the root folder where the generated files should be written to. Second, you will be asked if existing files should be overwritten or not.
Export All Files as ZIP
Add all generated files, regardless if selected or not, to a ZIP file using the relative paths as defined in the job definitions (without common root parent path). Then save the ZIP file to the file specified by a file chooser dialog.
The AgenPro Maven Plugin can be used to generate code for any language or format by using customized code generation templates. However the integration for Java is the primary use case.
Although the AgenPro command line interface provides already means to integrate AgenPro into an automated build process, the AgenPro Maven Plugin further improves and facilitates this integration for Java.
8.8.1Upgrade From AgenPro Maven Plugin Version 3
Version 3.x of the AgenPro Maven plugin used Maven 2.x. With version 4 you need to use at least Maven 3.1.1 or later.
The Plugin now overwrites the Job Property package with the <packageName> parameter provided in the plugin configuration. This behavior is new and might cause problems if you used the MIB node based property package in your custom template code (or if you need to use old templates for SNMP4J-Agent 1.x).
The MIB node attribute will not be overwritten anymore by the Maven plugin and because the MIB node attribute has precedence over the job property package the MIB node value will be used by the generation templates.
8.8.2Maven Plugin Installation
To install and use the AgenPro Maven Plugin you need
Maven 3.1.1 or later
AgenPro 5.0 or later.
Maven is available under the Apache License and is available for download from http://maven.apache.org.
Before you can start to install the AgenPro Maven Plugin you need to setup a local repository for your Maven installation and to specify a shortcut for the AgenPro Maven plugin prefix.
You can define your Maven settings in the settings.xml file in the .m2 directory within your home directory. The settings.xml file should contain at least the following configuration:
<settings>
<pluginGroups>
<pluginGroup>com.agentpp.agenpro.maven.plugins
</pluginGroup>
</pluginGroups>
<localRepository>C:/maven/repo</localRepository>
</settings>
The pluginGroups element specifies a shortcut for the plugin and the localRepository element where local third-party libraries can be stored (cached).
SNMP4J and SNMP4J-Agent JARs
Download SNMP4J and SNMP4J-Agent JAR files from https://snmp.app/dist/release/org/snmp4j and unpack them in a local folder. Then run the following Maven commands from the dist and lib directories respectively:
mvn install:install-file -Dfile=SNMP4J.jar
-DgroupId=org.snmp4j -DartifactId=snmp4j
-Dversion=3.4.4 -Dpackaging=jar -DgeneratePom=true
mvn install:install-file -Dfile=SNMP4J-Agent.jar
-DgroupId=org.snmp4j -DartifactId=snmp4j-agent
-Dversion=3.3.6 -Dpackaging=jar -DgeneratePom=true
AgenPro JAR
Download the AgenPro.jar file and install it into your Maven repository:
mvn install:install-file -Dfile=agenpro4.jar
-DgroupId=com.agentpp.agenpro -DartifactId=agenpro
-Dversion=4.0.0 -Dpackaging=jar -DgeneratePom=true
AgenPro Maven Plugin
Download the AgenPro Maven plugin and install it into your Maven repository:
Please always adjust the version parameter to the actual version of the plugin you are installing.
mvn install:install-file -Dfile=agenpro4-plugin.jar
-DgroupId=com.agentpp.agenpro.maven.plugins
-DartifactId=agenpro-plugin -Dversion=5.0.0
-Dpackaging=jar -DgeneratePom=true
8.8.3Using the AgenPro Maven Plugin
After installation of the plugin and the JARs it depends on, you can setup your SNMP agent Maven project. As a starting point for your own project, use the template project provided in directory agenpro-mvn-task of the AgenPro‘s installation directory.
The execution of the help:describe goal should print a description of the agenpro goal and its parameters. If you get a Maven error instead, please check if the AgenPro plugin is properly installed according to the description in Maven Plugin Installation.
To get a description of the plugin options, execute the following Maven goal:
mvn help:describe -DartifactId=agenpro-plugin
-DgroupId=com.agentpp.agenpro.maven.plugins -Ddetail
Before you can use the AgenPro Maven plugin you will have to configure your license key first. Edit the settings.xml file in your .m2 directory (see Maven Repository Settings) and add the agenProLicenseKey property as follows:
...
<profiles>
<profile>
<properties>
<agenProLicenseKey>lic / key</agenProLicenseKey>
</properties>
</profile>
</profiles>
Now edit the pom.xml file in the agenpro-mvn-task directory to define
1.the directory where the plugin should search for MIB specification files
2.the MIB modules from that files you want to generate code for
3.the AgenPro project file that contains the code generation settings and properties.
By default, the project file for the latest SNMP4J-Agent release is used and the MIB specifications are read from the src/main/smi folder.
Creating and Compiling the SNMP Agent
To create a simulation agent based on Agent.java run Maven with
mvn clean install
in the agenpro-mvn-task directory. Maven will then generate the Java classes for the specified MIB modules in the src/generated folder, compile them together with the Agent.java class and build a JAR with (and without) all dependencies included in the target folder.
To run the created agent simply execute
java -jar snmp4j-agenpro-agent-1.0-SNAPSHOT-jar-with-dependencies.jar udp:0.0.0.0/4700
The above command will run the agent on all local IP addresses on port 4700 using the UDP protocol.